
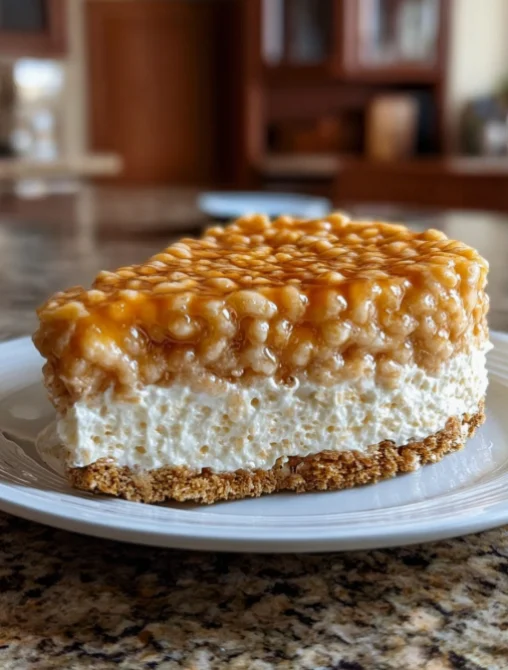
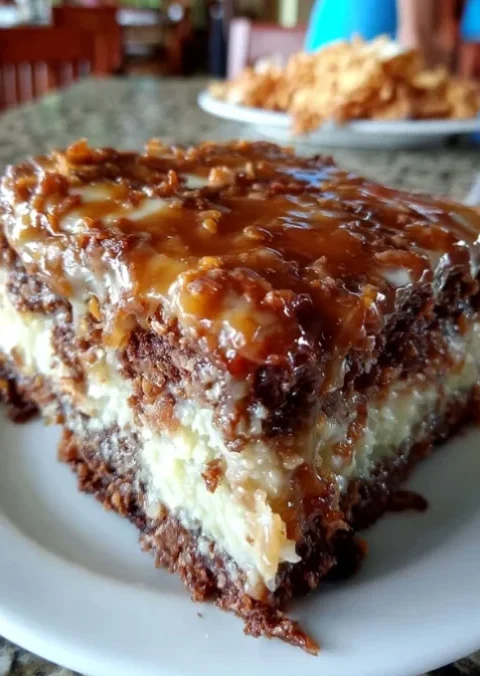
Indulging in dessert is one of life’s simplest pleasures, and when it comes to sweet treats that are both fun and delicious, the Rice Krispy Treat No-Bake Cheesecake stands out as a shining star. This innovative dessert combines the nostalgic flavors of crispy rice treats with the creamy richness of cheesecake, creating a delightful fusion that will please both kids and adults alike. No baking is required, making it an ideal recipe for hot summer days or those busy nights when you simply want to whip up something quick and satisfying. Imagine a smooth cheesecake filling nestled atop a crunchy Rice Krispies crust, each bite offering a perfect balance of textures and flavors. This treat not only satisfies your sweet tooth but also brings back fond memories of childhood snacks, making it a perfect addition to any gathering or a cozy night in. With its eye-catching layers and delightful flavor profile, this cheesecake will surely become a favorite in your dessert rotation. In fact, its unique combination of textures will keep you coming back for more. Whether served at a birthday party, a family gathering, or just as a weekday treat, this cheesecake is sure to be a hit.
Ingredients
To create this mouthwatering Rice Krispy Treat No-Bake Cheesecake, gather the following ingredients: You can learn more about this topic. For best results, ensure that all ingredients are measured precisely to achieve the desired flavor and texture. High-quality ingredients can make all the difference in the final outcome, so it’s worth sourcing the best you can find. Each component plays a critical role in the overall taste and quality of the cheesecake.
- For the crust:
- 4 cups Rice Krispies cereal: This cereal provides the signature crunch that pairs perfectly with the creamy filling. The crunchy texture also adds a delightful contrast to the creaminess of the cheesecake.
- 3 tablespoons butter, melted (for a richer flavor, consider using unsalted butter): Unsalted butter allows you to control the saltiness of the dessert better, ensuring that the sweetness of the cheesecake filling shines through.
- 1 package (10 oz) mini marshmallows: Mini marshmallows melt smoothly, creating a cohesive and sweet base for the crust. They also contribute to the gooey texture that holds the crust together.
- For the cheesecake filling:
- 16 oz cream cheese, softened (full-fat cream cheese yields the best results): Full-fat cream cheese provides the rich flavor and creamy texture that makes cheesecakes so indulgent, ensuring a decadent mouthfeel.
- 1 cup powdered sugar (for sweetness and a smooth texture): Powdered sugar dissolves easily and adds a light sweetness, balancing the cream cheese’s tanginess without creating graininess.
- 1 teaspoon vanilla extract (pure vanilla extract is recommended for the best flavor): Pure vanilla extract infuses the filling with a warm, aromatic sweetness, enhancing the overall flavor profile.
- 1 cup heavy whipping cream (chilled for optimal whipping): The heavy cream is crucial for achieving that light, fluffy texture in the cheesecake filling, making it airy and delicious.
- Optional toppings:
- Additional mini marshmallows for garnish (to enhance the playful aesthetic): These can add a fun and whimsical touch, making your dessert visually appealing. Use them as a playful topping or sprinkle them on during serving.
- Chocolate or caramel drizzle (for an indulgent finish): A drizzle not only enhances the flavor but also adds an elegant flair to your presentation, making the dessert more appealing and tempting.
- Crispy rice cereal for decoration (to add a crunchy touch on top): Sprinkling some extra Rice Krispies on top can create a beautiful contrast with the creamy filling, offering an additional texture that enhances each bite.
When selecting your ingredients, opt for high-quality cream cheese for a creamy texture and flavor. You can also substitute the butter with coconut oil for a dairy-free option. If you want to experiment, consider adding flavors like almond extract or citrus zest to the cheesecake mixture for a unique twist that complements the original recipe. Additionally, flavored cream cheeses like strawberry or chocolate can elevate the dessert and introduce exciting new dimensions of flavor. Check out our related guide for more tips on ingredient sourcing and selection, as well as suggestions for enhancing flavor through ingredient choices.
Steps / Instructions
- Prepare the crust: In a large saucepan, melt the butter over low heat. Stir gently to avoid burning and ensure even melting. Add the mini marshmallows and stir continuously until completely melted and smooth, ensuring there are no lumps remaining. The mixture should be glossy and fluid, resembling a thick syrup. Keep an eye on the heat to prevent the marshmallows from browning, which can change the flavor.
- Mix the cereal: Remove the saucepan from heat and add the Rice Krispies cereal to the melted marshmallow mixture. Stir until all the cereal is evenly coated, which may take a couple of minutes to ensure an even distribution of the sticky mixture. You want to see that every piece of cereal has a nice layer of the marshmallow coating for the best texture.
- Shape the crust: Press the mixture firmly into the bottom of a 9-inch springform pan. Use a spatula or your hands (dampened slightly to prevent sticking) to create an even layer. Make sure to pack it tightly to prevent the crust from crumbling later. Set aside to cool and firm up, which should take about 15-20 minutes at room temperature or in the fridge for a quicker set. You can use parchment paper in the base of the pan for easier removal later.
- Make the cheesecake filling: In a large mixing bowl, beat the softened cream cheese with an electric mixer until smooth and creamy, about 1-2 minutes. Gradually add the powdered sugar and vanilla extract, mixing until well incorporated and the mixture is light and fluffy. This step is crucial for achieving that signature cheesecake texture, ensuring there are no lumps.
- Whip the cream: In a separate bowl, whip the heavy cream until stiff peaks form, which generally takes about 3-5 minutes with a hand mixer. Be careful not to over-whip, as this can turn your cream grainy. Gently fold the whipped cream into the cream cheese mixture until fully combined, being careful not to deflate the whipped cream. This folding technique will ensure your filling is light and airy, creating that perfect cheesecake mouthfeel that everyone loves.
- Assemble the cheesecake: Pour the cheesecake filling over the prepared Rice Krispies crust, spreading it evenly with a spatula. Ensure that the filling reaches the edges for a clean presentation. You can create swirls in the filling with a knife for an artistic touch, which will enhance the visual appeal once cut.
- Chill: Cover the pan with plastic wrap and refrigerate for at least 4 hours or overnight, allowing the cheesecake to set properly. The longer it chills, the firmer and more flavorful it will become, allowing the flavors to meld beautifully. If you can wait, overnight chilling will yield the best results.
- Serve: Once set, remove the sides of the springform pan. Garnish with additional mini marshmallows, a drizzle of chocolate or caramel, and a sprinkle of crispy rice cereal for added texture. Consider slicing into wedges for easier serving, revealing the layers of this delightful dessert. Remember to use a sharp knife, and wipe it clean between cuts for a neat appearance.
Tips & Tricks
To ensure your Rice Krispy Treat No-Bake Cheesecake turns out perfectly, consider the following tips:
- Storing: Store any leftovers in the refrigerator, covered tightly, for up to 5 days. This cheesecake can also be frozen for up to 2 months; just be sure to wrap it well to prevent freezer burn. When thawing, allow it to sit in the refrigerator for a few hours before serving to regain its original texture. This is a great option for preparing in advance!
- Make-ahead option: This dessert is ideal for making ahead of time. Prepare it a day before a party to save time on the day of the event, allowing the flavors to meld beautifully. The cheesecake tastes even better the next day, making it a fantastic choice for gatherings or potlucks.
- Avoiding common mistakes: Make sure the cream cheese is at room temperature to avoid lumps in the filling. Also, be gentle when folding the whipped cream into the mixture to maintain its light and airy texture. Over-mixing can lead to a dense cheesecake, which is not the desired outcome. Take your time with each step for the best results!
- Serving tip: For a touch of elegance, serve with fresh berries or a scoop of vanilla ice cream on the side. A sprig of mint can also add a pop of color and freshness, enhancing the visual presentation of your dessert. The bright colors of seasonal berries can also contrast beautifully with the creamy filling, making it even more inviting to enjoy.

Rice Krispy Treat No-Bake Cheesecake
Course: Dessert Cuisine: American Difficulty: Easy
🍽️Servings8
⏱️Prep Time20 min
🍳Cook Time30 min
🔥Calories350Indulging in dessert is one of life’s simplest pleasures, and when it comes to sweet treats that are both fun and delicious, the Rice Krispy Treat No-Bake Cheesecake stands out as a shining star. This innovative dessert combines the nostalgic flavors of crispy rice treats with the creamy richness of cheesecake, creating a delightful fusion that will please both kids and adults alike. No baking is required, making it an ideal recipe for hot summer days or those busy nights when you simply want to whip up something quick and satisfying. Imagine a smooth cheesecake filling nestled atop a crunchy Rice Krispies crust, each bite offering a perfect balance of textures and flavors.
Cook Mode Keep the screen of your device onIngredients
-
4 cups Rice Krispies cereal
-
3 tablespoons unsalted butter, melted
-
1 package (10 oz) mini marshmallows
-
16 oz cream cheese, softened
-
1 cup powdered sugar
-
1 teaspoon vanilla extract
-
1 cup heavy whipping cream, chilled
-
Additional mini marshmallows for garnish
-
Chocolate or caramel drizzle
-
Crispy rice cereal for decoration
Directions
1.In a large saucepan, melt the butter over low heat. Stir gently to avoid burning and ensure even melting. Add the mini marshmallows and stir continuously until completely melted and smooth.
2.Remove the saucepan from heat and add the Rice Krispies cereal to the melted marshmallow mixture. Stir until all the cereal is evenly coated.
3.Press the mixture firmly into the bottom of a 9-inch springform pan. Use a spatula or your hands to create an even layer. Set aside to cool and firm up.
4.In a large mixing bowl, beat the softened cream cheese with an electric mixer until smooth. Gradually add the powdered sugar and vanilla extract until well incorporated.
5.In a separate bowl, whip the heavy cream until stiff peaks form. Gently fold the whipped cream into the cream cheese mixture until fully combined.
6.Pour the cheesecake filling over the prepared Rice Krispies crust, spreading it evenly with a spatula.
7.Cover the pan with plastic wrap and refrigerate for at least 4 hours or overnight.
8.Once set, remove the sides of the springform pan. Garnish with additional mini marshmallows, a drizzle of chocolate or caramel, and a sprinkle of crispy rice cereal.
Nutrition Facts
Recipe Reviews
- ★★★★★
Excellent recipe!
Leave a Reply
Your email address will not be published. Required fields are marked *
Rice Krispy Treat No-Bake Cheesecake
Indulging in dessert is one of life’s simplest pleasures, and when it comes to sweet treats that are both fun and delicious, the Rice Krispy Treat No-Bake Cheesecake stands out as a shining star. This innovative dessert combines the nostalgic flavors of crispy rice treats with the creamy richness of cheesecake, creating a delightful fusion that will please both kids and adults alike. No baking is required, making it an ideal recipe for hot summer days or those busy nights when you simply want to whip up something quick and satisfying. Imagine a smooth cheesecake filling nestled atop a crunchy Rice Krispies crust, each bite offering a perfect balance of textures and flavors.
Ingredients
- 4 cups Rice Krispies cereal
- 3 tablespoons unsalted butter, melted
- 1 package (10 oz) mini marshmallows
- 16 oz cream cheese, softened
- 1 cup powdered sugar
- 1 teaspoon vanilla extract
- 1 cup heavy whipping cream, chilled
- Additional mini marshmallows for garnish
- Chocolate or caramel drizzle
- Crispy rice cereal for decoration
Directions
In a large saucepan, melt the butter over low heat. Stir gently to avoid burning and ensure even melting. Add the mini marshmallows and stir continuously until completely melted and smooth.
Remove the saucepan from heat and add the Rice Krispies cereal to the melted marshmallow mixture. Stir until all the cereal is evenly coated.
Press the mixture firmly into the bottom of a 9-inch springform pan. Use a spatula or your hands to create an even layer. Set aside to cool and firm up.
In a large mixing bowl, beat the softened cream cheese with an electric mixer until smooth. Gradually add the powdered sugar and vanilla extract until well incorporated.
In a separate bowl, whip the heavy cream until stiff peaks form. Gently fold the whipped cream into the cream cheese mixture until fully combined.
Pour the cheesecake filling over the prepared Rice Krispies crust, spreading it evenly with a spatula.
Cover the pan with plastic wrap and refrigerate for at least 4 hours or overnight.
Once set, remove the sides of the springform pan. Garnish with additional mini marshmallows, a drizzle of chocolate or caramel, and a sprinkle of crispy rice cereal.
Nutrition Facts
Recipe Reviews
- ★★★★★
Excellent recipe!
Leave a Reply
Your email address will not be published. Required fields are marked *

Excellent recipe!