
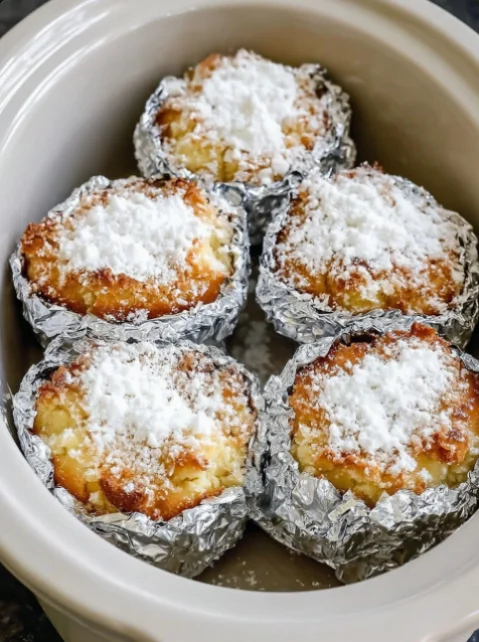
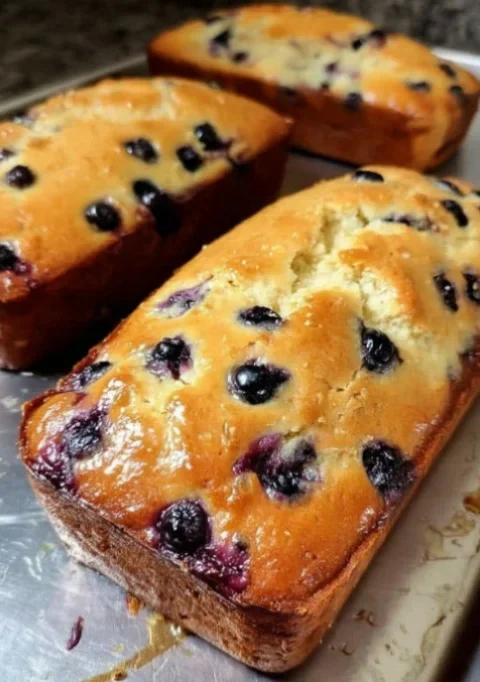
If you’re searching for a delightful way to combine the joy of baking with the simplicity of outdoor cooking, look no further than Foil Pouch Cakes! These individual dessert pouches are not only easy to prepare but also incredibly versatile, making them perfect for summer camping trips or cozy backyard gatherings. Imagine pulling a warm, moist cake from the fire, bursting with flavor and topped with fresh fruit, or perhaps a rich chocolate creation that melts in your mouth. Foil pouch baking is a creative and mess-free method that ensures each cake retains its moisture and flavor, making it a go-to technique for quick and easy cake recipes. Each bite of these cakes offers a unique experience, with the aromatic essence of outdoor cooking enhancing the flavors. Whether you’re a seasoned baker or a beginner, this recipe will inspire you to explore the endless possibilities of foil pouch desserts, providing a delightful and engaging baking experience.
Ingredients
- Dry Ingredients:
- 1 cup all-purpose flour
- 1/2 cup granulated sugar
- 1 teaspoon baking powder
- 1/4 teaspoon salt
- Wet Ingredients:
- 1/2 cup milk
- 1/4 cup vegetable oil
- 1 teaspoon vanilla extract
- Flavor Additions:
- 1/2 cup chocolate chips (for a chocolate foil cake recipe)
- 1/2 cup chopped fruit (for fruit-filled foil cakes such as berries or bananas)
- Optional: 1 teaspoon cinnamon for an extra layer of flavor, or a splash of almond extract for a unique twist.
Note: For those looking for gluten-free options, you can substitute the all-purpose flour with a 1:1 gluten-free flour blend, which works wonderfully in this recipe. Also, feel free to use almond milk or other dairy alternatives for a vegan option. The quality of your ingredients can greatly affect the final taste, so opt for fresh, high-quality fruit and premium chocolate. You can learn more about this topic.
Steps / Instructions
- Prepare the Foil: Cut a large piece of heavy-duty aluminum foil, about 12 inches long. Double the foil for added strength, ensuring it can hold the weight of the cake mixture without tearing.
- Mix Dry Ingredients: In a mixing bowl, whisk together the flour, sugar, baking powder, and salt until well combined. This step is crucial as it ensures that the leavening agent is evenly distributed throughout the batter, allowing for a uniform rise.
- Add Wet Ingredients: Pour in the milk, vegetable oil, and vanilla extract. Stir until just combined; don’t overmix, as this can lead to a dense cake. The batter should remain slightly lumpy, which is perfectly fine.
- Incorporate Flavor Additions: Gently fold in your choice of chocolate chips or chopped fruit, ensuring an even distribution throughout the batter. This is where you can experiment with different flavors and textures, making each cake a unique delight.
- Assemble the Pouch: Spoon the batter onto the center of the prepared foil. Be generous but leave some space around the edges to allow for expansion during baking. The batter should be about an inch high in the center.
- Seal the Foil: Fold the sides of the foil over the batter and then fold the ends tightly, creating a sealed pouch. Ensure there are no holes or gaps where steam could escape, as this is crucial for even cooking.
- Cook: Place the foil pouch on a grill or over campfire coals. Bake for approximately 15-20 minutes, or until the cake is set and a toothpick inserted in the center comes out clean. You can check the doneness by gently pressing the top; it should spring back slightly.
- Cool and Serve: Carefully open the pouch (watch for steam!) and enjoy your warm cake directly from the foil or transfer it to a plate. Consider topping it with whipped cream or a scoop of ice cream for an indulgent treat.
Tips & Tricks
- Foil Pouch Baking Tips: Ensure your foil is thick enough to prevent leaks, especially if using juicy fruits. If necessary, consider adding a second layer of foil for extra security.
- Storage: If you have any leftovers, store them in an airtight container in the refrigerator for up to 3 days. Reheat in the foil pouch over the grill or in the oven before serving to bring back the original moistness.
- Make Ahead: You can prepare the batter ahead of time and store it in a sealed container. When ready, simply fill the foil pouches and cook. This makes it an excellent option for busy days or spontaneous outings.
- Avoid Common Mistakes: Do not overfill the pouches, as the cake will expand while baking. Also, ensure the seal is tight to prevent any spillage. Check for any holes in the foil before placing on the heat.
Conclusion
Foil Pouch Cakes are not just a fun and interactive way to bake; they encapsulate the spirit of outdoor cooking and creativity. Whether you opt for a decadent chocolate foil cake or a refreshing fruit-filled version, these portable cake recipes will surely impress family and friends alike. Give this easy foil packet dessert a try, and enjoy the satisfaction of creating gourmet camping desserts without the hassle of traditional baking. Happy baking! Check out our related guide for more tips.

Foil Pouch Cakes
Course: Dessert Cuisine: American Difficulty: Easy
🍽️Servings—
⏱️Prep Time15 min
🍳Cook Time20 min
🔥Calories—These individual dessert pouches are not only easy to prepare but also incredibly versatile, making them perfect for summer camping trips or cozy backyard gatherings.
Cook Mode Keep the screen of your device onIngredients
-
1 cup all-purpose flour
-
1/2 cup granulated sugar
-
1 teaspoon baking powder
-
1/4 teaspoon salt
-
1/2 cup milk
-
1/4 cup vegetable oil
-
1 teaspoon vanilla extract
-
1/2 cup chocolate chips (for a chocolate foil cake recipe)
-
1/2 cup chopped fruit (for fruit-filled foil cakes such as berries or bananas)
-
Optional: 1 teaspoon cinnamon for an extra layer of flavor, or a splash of almond extract for a unique twist.
Directions
1.Cut a large piece of heavy-duty aluminum foil, about 12 inches long. Double the foil for added strength, ensuring it can hold the weight of the cake mixture without tearing.
2.In a mixing bowl, whisk together the flour, sugar, baking powder, and salt until well combined.
3.Pour in the milk, vegetable oil, and vanilla extract. Stir until just combined; don't overmix.
4.Gently fold in your choice of chocolate chips or chopped fruit.
5.Spoon the batter onto the center of the prepared foil, leaving some space around the edges.
6.Fold the sides of the foil over the batter and then fold the ends tightly, creating a sealed pouch.
7.Place the foil pouch on a grill or over campfire coals. Bake for approximately 15-20 minutes, or until the cake is set and a toothpick comes out clean.
8.Carefully open the pouch and enjoy your warm cake directly from the foil or transfer it to a plate.
Recipe Reviews
- ★★★★★
Excellent recipe!
Leave a Reply
Your email address will not be published. Required fields are marked *
Foil Pouch Cakes
These individual dessert pouches are not only easy to prepare but also incredibly versatile, making them perfect for summer camping trips or cozy backyard gatherings.
Ingredients
- 1 cup all-purpose flour
- 1/2 cup granulated sugar
- 1 teaspoon baking powder
- 1/4 teaspoon salt
- 1/2 cup milk
- 1/4 cup vegetable oil
- 1 teaspoon vanilla extract
- 1/2 cup chocolate chips (for a chocolate foil cake recipe)
- 1/2 cup chopped fruit (for fruit-filled foil cakes such as berries or bananas)
- Optional: 1 teaspoon cinnamon for an extra layer of flavor, or a splash of almond extract for a unique twist.
Directions
Cut a large piece of heavy-duty aluminum foil, about 12 inches long. Double the foil for added strength, ensuring it can hold the weight of the cake mixture without tearing.
In a mixing bowl, whisk together the flour, sugar, baking powder, and salt until well combined.
Pour in the milk, vegetable oil, and vanilla extract. Stir until just combined; don't overmix.
Gently fold in your choice of chocolate chips or chopped fruit.
Spoon the batter onto the center of the prepared foil, leaving some space around the edges.
Fold the sides of the foil over the batter and then fold the ends tightly, creating a sealed pouch.
Place the foil pouch on a grill or over campfire coals. Bake for approximately 15-20 minutes, or until the cake is set and a toothpick comes out clean.
Carefully open the pouch and enjoy your warm cake directly from the foil or transfer it to a plate.
Recipe Reviews
- ★★★★★
Excellent recipe!
Leave a Reply
Your email address will not be published. Required fields are marked *


Excellent recipe!