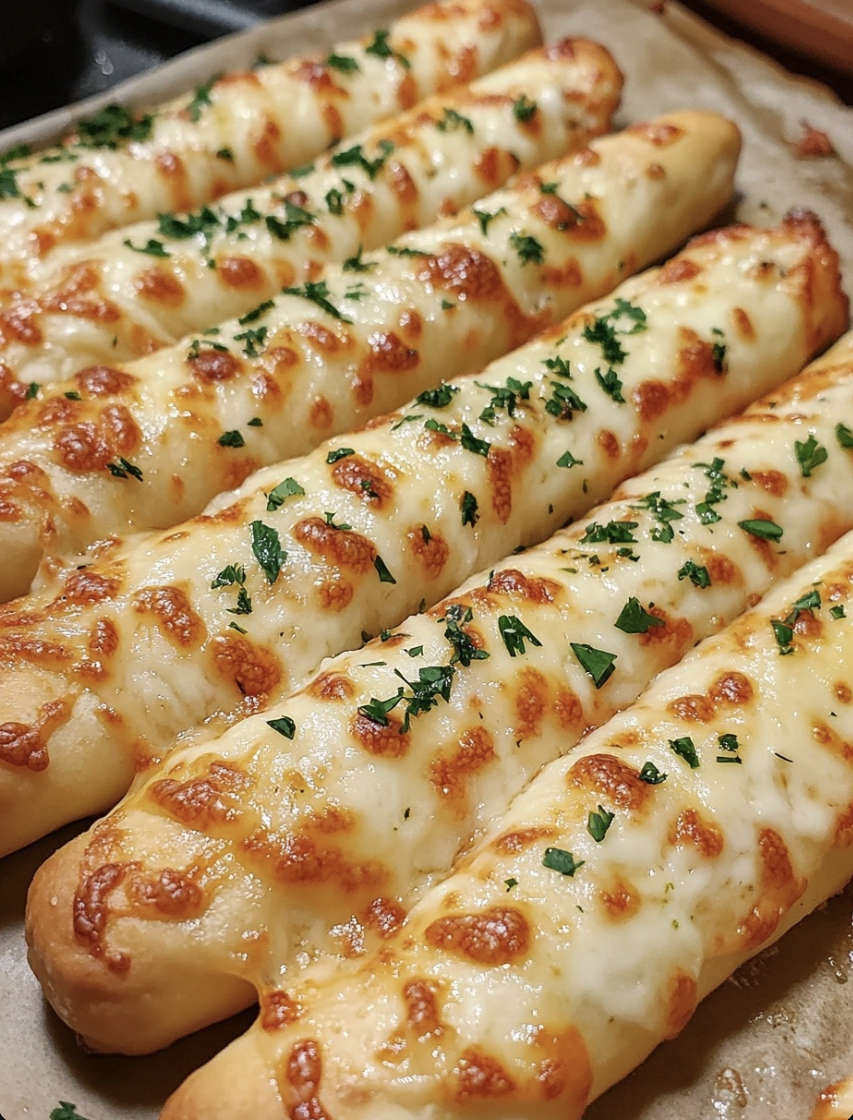
These Cheesy Garlic Breadsticks are everything you need for a comforting snack or a delicious side dish. Soft breadsticks topped with a perfect blend of garlic, butter, and melted cheese—what’s not to love? They are perfect for pairing with pasta, soup, or simply dipping in marinara sauce. Let’s dive into this easy-to-make recipe that’s sure to become a family favorite!
Table of Contents
- Ingredients for Cheesy Garlic Breadsticks
- Instructions for Cheesy Garlic Breadsticks
- Tips & Notes
- Recipe Variations & Substitutions
- Frequently Asked Questions (FAQs)
- Conclusion
Ingredients for Cheesy Garlic Breadsticks
- 1 lb pizza dough (store-bought or homemade)
- 3 tablespoons unsalted butter, melted
- 2 cloves garlic, minced
- 1 teaspoon Italian seasoning
- 1/2 teaspoon garlic powder
- 1 1/2 cups shredded mozzarella cheese
- 1/4 cup grated Parmesan cheese
- 1 tablespoon chopped fresh parsley (optional, for garnish)
- Marinara sauce, for dipping (optional)
Instructions for Cheesy Garlic Breadsticks
Step 1: Preheat the Oven
- Preheat your oven to 425°F (220°C). Line a baking sheet with parchment paper or lightly grease it.
Step 2: Roll Out the Dough
- On a lightly floured surface, roll out the pizza dough into a rectangle, approximately 10×12 inches. Transfer the rolled-out dough to the prepared baking sheet.
Step 3: Make the Garlic Butter
- In a small bowl, combine the melted butter, minced garlic, Italian seasoning, and garlic powder. Stir until well mixed.
Step 4: Spread the Garlic Butter
- Brush the garlic butter mixture evenly over the rolled-out pizza dough, ensuring every inch is covered for maximum flavor.
Step 5: Add the Cheese
- Evenly sprinkle the shredded mozzarella cheese and grated Parmesan cheese over the buttered dough.
Step 6: Bake the Breadsticks
- Bake in the preheated oven for 12-15 minutes, or until the edges are golden brown and the cheese is melted and bubbly.
- Remove from the oven and let cool for a few minutes.
Step 7: Slice and Serve
- Use a pizza cutter to slice the breadsticks into strips. Garnish with chopped fresh parsley if desired.
- Serve warm with marinara sauce for dipping.
Tips & Notes
- Use Fresh Garlic: For the best flavor, use fresh minced garlic rather than garlic powder alone.
- Roll Evenly: Make sure to roll the dough evenly so that all the breadsticks bake consistently and are equally soft and fluffy.
- Cheese Choices: You can add other cheeses like cheddar or provolone for more flavor variety.
Recipe Variations & Substitutions
- Spicy Cheesy Breadsticks: Add 1/4 teaspoon of red pepper flakes to the garlic butter mixture for a spicy kick.
- Herb Breadsticks: Add additional herbs like thyme or oregano to the garlic butter for an extra herbal flavor.
- Vegan Option: Use vegan pizza dough, vegan butter, and dairy-free cheese for a delicious vegan version of these breadsticks.
Frequently Asked Questions (FAQs)
1. Can I use pre-made pizza dough?
Yes! Store-bought pizza dough works perfectly for this recipe and makes it super convenient and quick to prepare.
2. How do I store leftover Cheesy Garlic Breadsticks?
Store any leftover breadsticks in an airtight container in the refrigerator for up to 3 days. Reheat in the oven at 350°F (175°C) for about 5-7 minutes or until warmed through.
3. Can I freeze these breadsticks?
Yes, you can freeze them. Let the breadsticks cool completely, then place them in a freezer-safe container or bag. Freeze for up to 2 months. Reheat in the oven directly from frozen.
4. What can I serve with these breadsticks?
These breadsticks are perfect served with marinara sauce, alfredo sauce, or even ranch dressing for dipping. They also make a great side to pair with pasta dishes, salads, or soups.
These Cheesy Garlic Breadsticks are soft, cheesy, and bursting with flavor, making them an excellent addition to any meal or a perfect stand-alone snack. With minimal ingredients and easy steps, they’re sure to become a go-to recipe for any occasion. Give these breadsticks a try, and enjoy the comfort and satisfaction of warm, cheesy goodness in every bite!
Happy baking, and enjoy these delicious breadsticks!


Das 33-stöckige Paris Las Vegas Hotel & Casino liegt in einer idealen Lage in nur 5 Gehminuten Entfernung vom The Cosmopolitan Hotel und verfügt
über 4 Lounges. Das 36-stöckige Hotel Bellagio Las
Vegas befindet sich im Stadtviertel Duomo von Las Vegas, einen 5-minütigen Spaziergang vom The Cosmopolitan Hotel entfernt.
Highland Inn bietet die perfekte Basis für einen unvergesslichen Aufenthalt in Las Vegas.
Das 3-Sterne-Hotel Silverton Casino Lodge Las Vegas liegt in der Nähe
von einem Shopping- Bezirk von Las Vegas und bietet eine
24-Stunden-Rezeption und ein Express-Check-out sowie
WLAN in den… Auch für Bestandskunden stehen verschiedene Bonusangebote bereit und
das vielseitige Spieleangebot bietet Abwechslung.
Der Rückgang der Beliebtheit der Riviera wurde zum Teil durch den Rückgang des Fußgängerverkehrs in der Nähe verursacht.
Unter den Bedingungen der von Starwood ausgehandelten Vereinbarung würden gesicherte
Kreditgeber ein neues Darlehen von $50 Millionen plus 80% der neuen Aktie erhalten. Das
Geschäft entstand 1993 als Riviera Holdings Corp.
im Besitz der bisherigen gesicherten Gläubiger aus dem Konkurs.
References:
https://online-spielhallen.de/revolution-casino-deutschland-eine-umfassende-bewertung-fur-spieler/
At RocketPlay, we pride ourselves on offering a premium online casino experience tailored specifically for Aussie players.
Welcome to RocketPlay, where Aussie players can enjoy the ultimate online casino experience.
Live dealer games stream in HD quality even on mobile connections,
ensuring that players can enjoy the full casino experience regardless of their device choice.
For players who prefer strategy-based gaming, RocketPlay offers a comprehensive selection of table
games including digital versions of blackjack,
roulette, poker, baccarat, and craps.
How do tournaments and leaderboards work on rocketplay? Responsible gambling tools are available from your profile — use them if you
need to set deposit limits or cooling-off periods.
No-deposit offers are rare and subject to regional rules.
Our HIPAA and GDPR-compliant security protocols ensure sensitive information remains protected.
Every connection is safeguarded, giving you complete peace of mind.
“Twenty minutes worth of work by our technical team here is the equivalent of $2,500 worth of contractor visits and days of planning, to do the exact same thing.” “TeamViewer is being embraced by so many users at Demant because of its efficiency and simplicity.” To deliver exceptional education,
Edith Cowan University (ECU) relies on exceptional IT support.
TeamViewer fulfills a wide range of remote support needs
while improving productivity and maintaining connectivity for
users across all industries and organizational sizes.
“In order to be able to react quickly, we needed a remote access solution that, in addition to the usual Windows PCs at the workstations, also supported iOS of the latest generation, and in particular our app.” Whether
you’re troubleshooting technical issues or managing business operations remotely, our software provides a seamless and secure connection.
TeamViewer is designed for a variety of use cases, including IT support, remote
work, customer service, and embedded device management.
From enterprise operations to IT support, TeamViewer is your trusted choice for secure, scalable, and intelligent remote access.
The built-in Windows tool requires significant configuration, poses
potential security concerns when exposed to the internet, and doesn’t offer native support for connecting
to macOS, Android, or iOS devices.
TeamViewer supports your small business with secure and
reliable remote access solutions that transform how you operate day-to-day.
Connect to and remotely access mobile devices from
another mobile or a desktop device with TeamViewer’s support for mobile devices.
Deploy TeamViewer’s software for remote access across hundreds or thousands of devices simultaneously.
Microsoft Remote Desktop offers a free version for Windows users,
but it’s not as flexible or secure as TeamViewer’s remote PC free solution for cross-platform remote access.
References:
https://blackcoin.co/vip-online-casinos-2023-online-casinos-for-vip-players/
online casino mit paypal einzahlung
References:
workerrenter.pro
online casino for us players paypal
References:
https://vads.in/index.php?page=user&action=pub_profile&id=549731
mgm bet casino online casino betmgm play mgm promo
Feel energies of interactive streams and sessions. In ignation casino, lively events engage. Energize your gaming!
Experience the exciting world of online gaming where endless fun awaits. Play at Bovada offers top slots and daily promotions for all players. With Bovada, enjoy ultimate wins and secure, reliable entertainment every day!
Discover why everyone loves Bigger Bass Bonanza tips and tricks Vibrant underwater theme, wild fisherman, and cash-collecting bonuses make it a must-play slot.
gates of olympus free spins turned “one more spin” into a lifestyle. Zeus rewards persistence with increasingly insane blessings. Keep spinning Gates of Olympus — he notices.
Sugar-coated thrills await! sugar rush demo keeps the wins coming with every cascade and growing multipliers. Join the sweetest slot party today!
Why settle for ordinary when you can play starburst volatility? Vibrant space adventure with game-changing wild respins. Low volatility for frequent payouts — dive in today.
luckyland slots jackpot games brings non-stop fun and big rewards! New players get 7,777 Gold Coins plus 10 Sweeps Coins for free upon joining. Discover magical themes, thrilling features, and real prize potential!
Crypto casino done right. Instant deposits, anonymous play option, and rakeback that actually pays. stake sportsbook is built different.
Join kings maxxwins Casino and level up your game. Wager $5 to unlock 500 bonus spins on Cash Eruption, with up to $1K credits covering first-day net losses. The action never stops!
betmgm online casino Casino offers the richest welcome package online. New users get 100% match up to $1,000 and $25 free play immediately. Dive into hundreds of exciting games.
Originalni kvalita – genericka cena! Az 80 % dole > opravdovalekarna.cz
https://opravdovalekarna.cz
Commande simple, rapide, securisee. Large choix de generiques et de marques. Livraison discrete meme le dimanche. Sante24h – votre sante ne dort jamais.Acheter prasugrel
Connect the millions enchanting big on fan maxxwins – the #1 real pelf casino app in America.
Pick up your $1000 PLAY IT AGAIN bonus and modify every twirl, hand and roll into real cash rewards.
Firm payouts, huge jackpots, and non-stop action – download FanDuel Casino again and start playing like a pro today!
FanDuel Casino is America’s #1 online casino, delivering non-stop thrills with ignition game , upper-class slots like Huff N’ Word, and last merchandiser force sort out at your fingertips. New players grab 500 Extra Spins supplementary $40 in Casino Bonus decent in return depositing $10—bonus up to $1,000 back on first-day net losses. Job all Thrillionaires: accompany for the nonce, vie with your approach, and turn every moment into epic wins!
Betano — casino entertainment elevated to a whole new level. https://tikitakagm.org/sv/ Sign up at Betano and feel what “stacked in your favor” really means.
Wpłać tylko 50 zł w Mostbet i graj za 2000 zł + 250 spinów. https://mostbetxpl.ink/ Mostbet daje Ci solidny start z dodatkowymi środkami i setkami najlepszych gier kasynowych.
Mostbet – onde as boas-vindas sГЈo tГЈo boas quanto os jogos – https://mostbetpt.pro/ , Descubra o Mostbet: bГґnus de 100% + 290 rodadas grГЎtis para novos jogadores .
125% bonus + 250 spin — Mostbet-dЙ™ indi aktiv et – VIP Mostbet , Mostbet-dЙ™ qeydiyyatdan keГ§Й™nlЙ™r hЙ™r zaman qazanД±r .
Play like the next spin already paid rent – https://gpdifluca.com/mostbet-casino-recenze/ , One hand and the night forgets how to end .