
Introduction
Indulge in the nostalgic flavors of the past with our retro bakery buttermilk pie recipe. Transport yourself back in time with each decadent bite of this classic dessert. Whether you’re a fan of retro desserts or simply looking to try something new, this buttermilk pie is sure to delight your taste buds.
At our bakery, we take pride in preserving the traditional recipes that have stood the test of time. Our retro buttermilk pie is a beloved classic that has been passed down through generations, and now you can enjoy it in the comfort of your own home. Let’s dive into the delightful world of retro baking with our buttermilk pie!
As you explore this article, you’ll uncover the secrets behind our signature retro bakery buttermilk pie recipe. From the finest ingredients to expert baking tips, we’ll guide you through every step of the process. Get ready to embark on a culinary journey filled with sweetness and nostalgia.
Whether you’re hosting a gathering, celebrating a special occasion, or simply craving a delicious dessert, our retro buttermilk pie is the perfect choice. Join us as we unravel the magic of this timeless treat and learn why it has captured the hearts of dessert lovers everywhere.
Why You’ll Love This Recipe
Our retro bakery buttermilk pie stands out for its irresistible combination of creamy filling and flaky crust. This recipe is a crowd-pleaser, loved for its rich flavor and comforting texture. The buttermilk adds a subtle tanginess that balances perfectly with the sweetness of the pie.
One of the best features of this buttermilk pie is its versatility. Whether you enjoy it warm or chilled, as a standalone dessert or paired with a dollop of whipped cream, this pie caters to every palate. Additionally, our recipe can be easily adapted to suit various dietary preferences, including gluten-free and vegan options.
Experience the joy of baking from scratch with our homemade retro buttermilk pie. Unlike store-bought versions, our pie is made with love and attention to detail, ensuring a truly authentic taste. Treat yourself to a slice of nostalgia with each bite of this delightful dessert.
Indulge in a slice of history with our retro bakery buttermilk pie, a timeless classic that has been enjoyed for decades. Whether you’re reminiscing about the past or creating new memories, this pie is the perfect companion for any occasion. Join us in savoring the flavors of yesteryear with a modern twist.
Ingredients
Our retro bakery buttermilk pie recipe calls for simple yet flavorful ingredients that come together to create a harmonious blend of tastes and textures. To make this delectable dessert, you will need:
– Fresh buttermilk
– All-purpose flour
– Sugar
– Eggs
– Unsalted butter
– Vanilla extract
– Nutmeg
– Pie crust (store-bought or homemade)
For those with dietary restrictions or preferences, feel free to explore alternative ingredients such as gluten-free flour, plant-based butter, or egg substitutes. These variations allow you to enjoy the essence of our retro buttermilk pie while catering to your specific needs.
Prepare your ingredients thoughtfully, ensuring you have everything you need to create a perfect retro bakery buttermilk pie. The quality of your ingredients will greatly influence the final outcome, so choose wisely and let the baking begin!
Once you’ve gathered all the necessary components, you’re ready to embark on a culinary adventure that will transport you to a bygone era. Get your mixing bowls ready and let’s start baking this delectable retro treat!
Step-by-Step Instructions
Follow these simple steps to create your own retro bakery buttermilk pie masterpiece:
1. Preheat your oven to 350°F (175°C) and prepare your pie crust in a pie dish.
2. In a mixing bowl, combine the sugar and flour. Add the melted butter, beaten eggs, buttermilk, vanilla extract, and nutmeg. Mix until smooth.
3. Pour the filling into the prepared pie crust and bake for 45-50 minutes, or until the center is set and the top is golden brown.
4. Allow the pie to cool before slicing and serving. Enjoy a slice of retro bliss with each bite!
For best results, refrigerate any leftovers and reheat slices before serving for a fresh-out-of-the-oven experience. Now that you’ve mastered the art of retro buttermilk pie baking, share this delightful dessert with your loved ones and bask in their admiration.
Remember, practice makes perfect, so don’t be disheartened if your first attempt isn’t flawless. Baking is a journey of discovery and learning, and each pie you make brings you one step closer to baking perfection.
Experiment with different techniques and flavors to make this retro bakery buttermilk pie truly your own. Whether you add a sprinkle of cinnamon or a drizzle of caramel, let your creativity shine through in every slice.
Expert Tips for Success
For a foolproof retro bakery buttermilk pie, keep these expert tips in mind:
– Use room temperature ingredients to ensure a smooth and well-incorporated filling.
– Avoid overmixing the batter to prevent a tough texture in the final pie.
– For a golden brown crust, brush the pie with an egg wash before baking.
– Allow the pie to cool completely before slicing to achieve clean and neat cuts.
By following these expert tips, you’ll elevate your retro buttermilk pie to a new level of perfection. Impress your friends and family with a pie that not only tastes divine but also looks professionally crafted.
Embrace the baking journey with confidence and enthusiasm, knowing that each pie you create is a testament to your culinary skills and creativity. With these expert tips, you’re well on your way to becoming a retro baking aficionado!
Variations and Substitutions
Explore the endless possibilities of customizing your retro bakery buttermilk pie:
– Add a citrus twist by incorporating lemon or orange zest into the filling.
– Swap the traditional pie crust for a graham cracker or cookie crust for a unique flavor profile.
– Experiment with different spices such as cinnamon, cardamom, or ginger to enhance the complexity of the pie.
– For a healthier option, use low-fat buttermilk and reduce the sugar content without compromising on taste.
Don’t be afraid to get creative in the kitchen and put your own spin on this classic recipe. Personalize your retro buttermilk pie to suit your preferences and surprise your taste buds with innovative flavor combinations.
Whether you’re a seasoned baker or a novice enthusiast, exploring variations and substitutions is a fun way to expand your baking repertoire and discover new culinary delights. Let your imagination run wild and see where it takes you on your retro baking journey!
Serving Suggestions
Enhance the enjoyment of your retro bakery buttermilk pie with these serving suggestions:
– Serve each slice with a dollop of freshly whipped cream or a scoop of vanilla ice cream for a decadent treat.
– Drizzle warm caramel sauce or chocolate ganache over the pie for an indulgent finishing touch.
– Pair the pie with a cup of hot coffee or a glass of cold milk to complement its rich and creamy flavors.
– Garnish each slice with a sprinkle of cinnamon or nutmeg for an extra burst of flavor and visual appeal.
Transform your retro buttermilk pie into a delightful dessert experience by incorporating these serving suggestions. Elevate each slice to a gourmet level and impress your guests with a beautifully presented and utterly delicious treat.
Whether you’re hosting a dinner party, celebrating a special occasion, or simply treating yourself to a well-deserved dessert, these serving ideas will take your retro buttermilk pie to the next level of culinary delight.
FAQs
Here are some common questions about our retro bakery buttermilk pie:
Q: Can I make this pie ahead of time?
A: Yes, you can prepare the pie a day in advance and refrigerate it until ready to serve.
Q: Can I freeze leftover slices of buttermilk pie?
A: Absolutely! Wrap the slices tightly in plastic wrap and aluminum foil before freezing for up to one month.
Q: How can I prevent the pie crust from becoming soggy?
A: Blind bake the pie crust before adding the filling to ensure a crisp and flaky base for your pie.
Q: Can I use buttermilk substitutes in this recipe?
A: While buttermilk adds a unique flavor to the pie, you can use a mixture of milk and lemon juice as a substitute if needed.
Explore these FAQs to troubleshoot any concerns you may have while making your retro buttermilk pie. With these helpful tips, you’ll navigate the baking process smoothly and achieve delicious results every time.
Final Thoughts
As you reach the end of this culinary journey through retro baking, we hope you’ve been inspired to try our signature buttermilk pie recipe. Embrace the warmth and charm of this timeless dessert, and create lasting memories with each slice you savor.
Our retro bakery buttermilk pie is more than just a dessert—it’s a celebration of tradition, creativity, and the joys of baking. Share this delightful treat with your loved ones, and let the flavors of the past transport you to a place of sweet nostalgia and culinary bliss.
Whether you’re a seasoned baker or a novice in the kitchen, our retro buttermilk pie is a delightful recipe that welcomes all to the world of retro baking. So roll up your sleeves, preheat your oven, and embark on a baking adventure that promises to delight your senses and fill your home with the aroma of nostalgia.
Join us in rediscovering the magic of retro desserts and creating new memories with each batch of buttermilk pie you bake. From our kitchen to yours, we wish you happy baking and a lifetime of delicious retro treats!
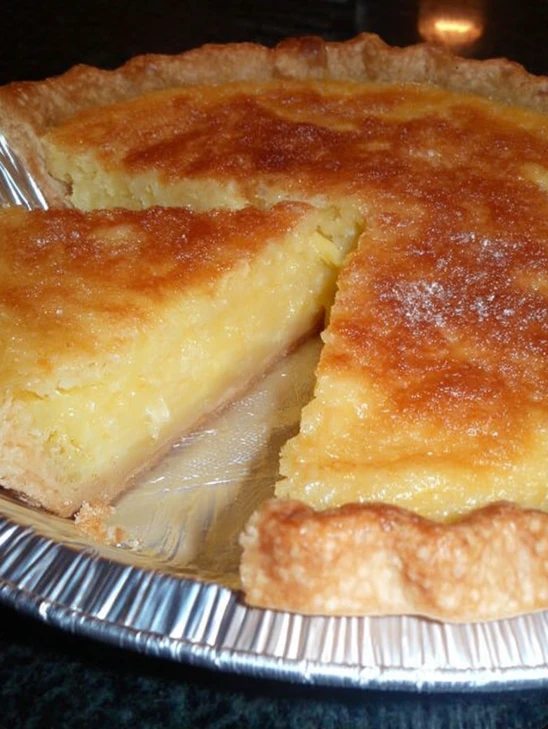
Retro Bakery Buttermilk Pie
Indulge in the nostalgic flavors of the past with this retro bakery buttermilk pie. A classic dessert loved for its creamy filling, flaky crust, and perfect balance of tanginess and sweetness. Enjoy a slice of history with each bite of this delightful treat!
Ingredients
- 2 cups fresh buttermilk
- 1/4 cup all-purpose flour
- 1 cup sugar
- 3 eggs, beaten
- 1/2 cup unsalted butter, melted
- 1 teaspoon vanilla extract
- 1/4 teaspoon nutmeg
- 1 pie crust (store-bought or homemade)
Directions
- Preheat the oven to 350°F (175°C) and prepare the pie crust in a pie dish.
- In a mixing bowl, combine sugar, flour, melted butter, beaten eggs, buttermilk, vanilla extract, and nutmeg. Mix until smooth.
- Pour the filling into the prepared pie crust and bake for 45-50 minutes until the center is set and the top is golden brown.
- Allow the pie to cool before slicing and serving. Enjoy!
[…] From mixing the batter to drizzling the luscious glaze, each step is designed to help you achieve bakery-worthy results in your own […]