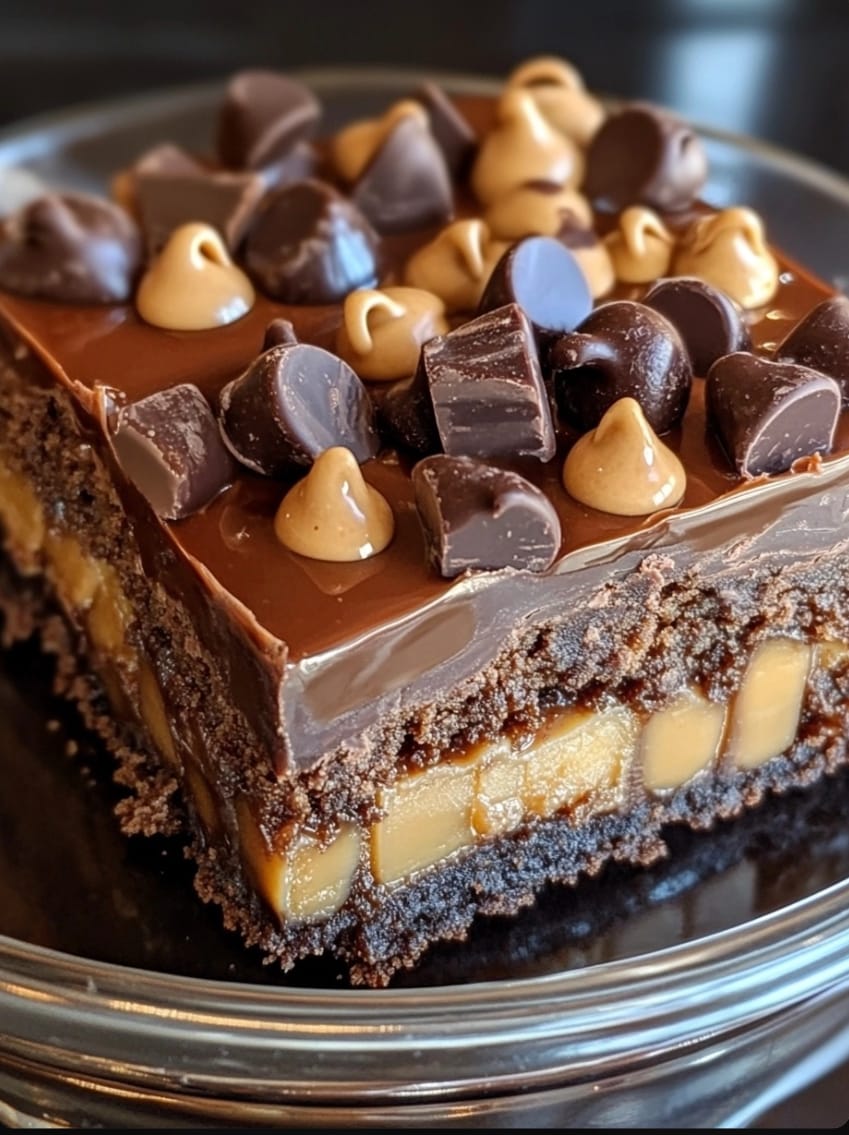
If you love peanut butter cups, then this Peanut Butter Cup Dump Cake is your dream dessert! It’s rich, gooey, and incredibly easy to make—just dump all the ingredients into a baking dish and let the oven do the work. Filled with chocolatey goodness and creamy peanut butter, this cake is perfect for any occasion when you need a decadent dessert with minimal effort. Whether it’s for a family gathering, a potluck, or just a treat-yourself night, this dessert has everything you crave. With layers of chocolate, peanut butter, and a touch of crunch, it’s impossible to resist. Let’s dive in and whip up this sweet, irresistible treat that’s sure to please everyone.
The Peanut Butter Cup Dump Cake combines all the best elements of a rich chocolate cake with the smooth, nutty flavor of peanut butter. It’s a dessert that hits all the right notes for chocolate lovers and peanut butter enthusiasts alike. The beauty of this cake is in its simplicity—there’s no need for fancy equipment or complicated steps, and yet the result is something that tastes like you’ve spent hours in the kitchen. The melted peanut butter cups scattered throughout add bursts of flavor, while the cake itself stays moist and gooey thanks to the layers of pudding and butter. Let’s get started on this no-fuss, show-stopping dessert!
Table of Contents
- Ingredients
- Instructions
- Cook Notes & Tips
- Recipe Variations
- Frequently Asked Questions (FAQs)
- Conclusion
Ingredients
- 1 box chocolate cake mix
- 1 1/2 cups milk
- 1 cup creamy peanut butter
- 1 package (3.9 oz) instant chocolate pudding mix
- 1 cup Reese’s peanut butter cups, chopped
- 1/2 cup chocolate chips
- 1/4 cup unsalted butter, melted
- 1/2 cup crushed peanuts (optional, for topping)
- Vanilla ice cream, for serving (optional)
Ingredient Details
- Chocolate Cake Mix: You can use any brand of chocolate cake mix, but make sure it’s one you like. The cake mix will serve as the foundation of this decadent dessert, so a high-quality mix is recommended.
- Peanut Butter: Creamy peanut butter works best for this recipe, as it mixes in more evenly. If you prefer a chunkier texture, you can use crunchy peanut butter for an added layer of crunch.
- Instant Chocolate Pudding Mix: The pudding mix helps keep the cake moist and gives it a rich, gooey texture. It also adds another depth of chocolate flavor, enhancing the overall indulgence of the cake.
- Reese’s Peanut Butter Cups: These iconic candies are the highlight of the cake. You can chop them into large or small pieces depending on your preference. For an extra indulgent experience, use both regular and mini Reese’s cups.
- Chocolate Chips: Use semisweet or milk chocolate chips, whichever you prefer. The chocolate chips will melt slightly during baking, giving pockets of gooey chocolate throughout the cake.
- Butter: The melted butter adds richness and helps to moisten the cake as it bakes.
Instructions
- Preheat Oven
- Preheat your oven to 350°F (175°C). Grease a 9×13-inch baking dish with non-stick spray. This helps to ensure the cake does not stick and makes it easier to serve.
- Layer the Ingredients
- Spread the instant chocolate pudding mix evenly over the bottom of the prepared baking dish. Pour the milk over the pudding mix, ensuring that it is evenly distributed. The milk and pudding mixture will create a rich, gooey base for the cake.
- Add the Cake Mix
- Sprinkle the chocolate cake mix evenly over the top of the pudding layer. Do not stir—just spread it out evenly. The dry cake mix will blend with the other ingredients as it bakes, forming a deliciously textured cake.
- Add the Peanut Butter and Butter
- Drop spoonfuls of the creamy peanut butter across the top of the cake mix. The peanut butter will add pockets of nutty flavor throughout the cake. Drizzle the melted butter over the cake mix, covering as much of the surface as possible. The butter helps to moisten the cake mix and ensures that it bakes evenly.
- Add the Toppings
- Sprinkle the chopped Reese’s peanut butter cups and chocolate chips evenly over the top. This layer will melt into the cake, creating rich, chocolatey pockets that complement the peanut butter perfectly. If desired, add crushed peanuts for extra crunch.
- Bake
- Bake in the preheated oven for 35-40 minutes, or until the top is set and the edges are bubbling. The cake should look gooey, but the top should be firm. This ensures that the cake stays moist and delicious while still being easy to slice and serve.
- Serve
- Let the cake cool slightly before serving. Serve warm with a scoop of vanilla ice cream for an extra indulgent treat. The ice cream will melt over the warm cake, creating an irresistible combination of hot and cold, creamy and crunchy.
Cook Notes & Tips
- Cake Mix: Do not stir the layers once you add the cake mix. Dump cakes are all about layering and allowing the ingredients to bake together. This layering creates a unique texture where the cake is fluffy in some areas and gooey in others.
- Peanut Butter: You can use chunky peanut butter if you prefer more texture in the cake. It adds a delightful crunch and works well with the chopped Reese’s.
- Serving Suggestion: This cake is best served warm, straight out of the oven with a scoop of vanilla ice cream to balance the rich flavors. The combination of warm cake and cold ice cream is simply unbeatable.
- Storage: Store any leftovers in an airtight container in the refrigerator. When reheating, microwave individual servings for about 20-30 seconds to bring back the gooey texture.
Recipe Variations
- Peanut Butter and Banana: Add sliced bananas between the pudding and cake mix layers for a sweet, fruity twist. The banana flavor pairs perfectly with the chocolate and peanut butter.
- Marshmallow Twist: Add mini marshmallows to the top of the cake before baking for a gooey, marshmallow layer. The marshmallows will melt and create a fluffy, sweet topping.
- Salted Caramel: Drizzle salted caramel sauce over the top before baking for an extra sweet and salty flavor. The salted caramel enhances the chocolate and peanut butter flavors while adding a delightful contrast.
- Nutella Swirl: Swirl in a few spoonfuls of Nutella before baking for a hazelnut-chocolate twist. The Nutella adds an extra layer of richness that pairs beautifully with the other ingredients.
Frequently Asked Questions (FAQs)
Q: Can I make this cake ahead of time? A: Yes, but it’s best enjoyed fresh and warm. If you make it ahead, you can reheat it in the oven at 300°F for about 10 minutes before serving. This helps to restore the gooey texture and brings back the rich flavors.
Q: Can I use a different cake mix flavor? A: Absolutely! Yellow or devil’s food cake mix also works well in this recipe for a different flavor combination. The yellow cake mix provides a slightly lighter flavor, while the devil’s food cake makes it extra chocolatey.
Q: How should I store leftovers? A: Store leftovers in an airtight container in the refrigerator for up to 3 days. Reheat individual portions in the microwave for about 20 seconds. You can also enjoy the cake cold, as the flavors intensify after chilling.
Q: Can I freeze this cake? A: Yes, you can freeze the cake. Allow it to cool completely, then wrap it tightly in plastic wrap and aluminum foil. Store it in the freezer for up to 3 months. When ready to eat, thaw in the refrigerator overnight and reheat in the oven.
This Peanut Butter Cup Dump Cake is the ultimate no-fuss dessert that brings together the classic flavors of chocolate and peanut butter in the easiest way possible. It’s rich, gooey, and packed with delicious peanut butter cups, making it perfect for any celebration or just when you want to indulge. The combination of warm chocolate, creamy peanut butter, and melted candy is pure bliss. Serve it warm with vanilla ice cream and enjoy each decadent bite of this effortless dessert. It’s sure to become a favorite in your household—an instant hit for kids and adults alike. Make it once, and you’ll find yourself reaching for this recipe again and again, whenever you need a comforting, sweet treat.


1