Introduction
Indulge in the delightful world of Danish Dream Cake, a treat that will transport your taste buds to a realm of sweetness and nostalgia. This classic dessert holds a special place in Danish culinary traditions, cherished for its heavenly flavors and comforting textures. Join us on a journey to discover the secrets behind this beloved recipe and learn how to create your own slice of Danish culinary magic.
As we delve into the realm of Danish Dream Cake, you’ll uncover the essence of this dessert that has captured the hearts of many. From its humble origins to its modern adaptations, the Danish Dream Cake recipe has stood the test of time, offering a perfect blend of simplicity and indulgence. Get ready to embark on a culinary adventure filled with buttery goodness, aromatic coconut, and a touch of Danish charm.
Whether you’re a baking enthusiast looking for a new challenge or a dessert lover eager to explore international flavors, mastering the art of Danish Dream Cake will elevate your culinary repertoire. Prepare to be enchanted by the tantalizing aroma that fills your kitchen as you follow our easy Danish Dream Cake instructions and unlock the secrets to creating a delectable treat that will impress family and friends alike.
Join us as we unravel the story behind this iconic dessert, discover the traditional Danish Dream Cake ingredients, and embark on a baking journey that will leave you craving more. Get ready to savor every bite of this heavenly confection as you uncover the magic of Danish Dream Cake.
Why You’ll Love This Recipe
Indulge in the simplicity and elegance of this Danish Dream Cake recipe, where every bite is a symphony of flavors and textures. The easy Danish Dream Cake instructions ensure that even beginners can master this delectable dessert with confidence. With its luscious coconut topping and buttery base, this recipe promises a delightful culinary experience that will leave you craving more.
For those with dietary restrictions, fear not, as this recipe offers a gluten-free Danish Dream Cake option and provides insights into vegan Danish Dream Cake alternatives. Whether you’re looking for a traditional treat or a modern twist, this recipe caters to all, making it a versatile choice for any occasion.
Discover the joy of baking as you follow our step-by-step tutorial and unlock the best Danish Dream Cake tips to ensure a flawless outcome every time. From the first mix of ingredients to the final golden bake, this recipe promises a rewarding and delicious journey for all who dare to dream of Danish culinary perfection.
Prepare to impress your guests with a homemade Danish Dream Cake that rivals any bakery creation. With its rich history and irresistible flavors, this dessert is sure to become a favorite in your repertoire, perfect for special occasions or everyday indulgences.
Ingredients
Prepare to gather the following traditional Danish Dream Cake ingredients to embark on your baking adventure:
– All-purpose flour
– Sugar
– Butter
– Milk
– Baking powder
– Vanilla extract
– Eggs
For a gluten-free option, you can use alternative flour blends, ensuring that everyone can enjoy the magic of Danish Dream Cake. Feel free to experiment with ingredient substitutions to cater to your preferences and dietary needs.
Step-by-Step Instructions
Let’s dive into the art of creating Danish Dream Cake with our easy-to-follow instructions:
1. Preheat your oven and prepare your baking pan.
2. Mix the flour, sugar, and butter to create the base of the cake.
3. Add the milk, baking powder, and vanilla extract to the batter.
4. Beat the eggs and gently fold them into the mixture.
5. Pour the batter into the pan and sprinkle with a generous amount of coconut topping.
6. Bake until golden brown and allow the cake to cool before serving.
Follow these steps diligently to ensure a perfect Danish Dream Cake every time. Don’t forget to refer to our Danish Dream Cake baking guide for additional tips and tricks to elevate your baking skills.
Expert Tips for Success
Unlock the secrets to mastering Danish Dream Cake with these expert tips:
– Use room temperature ingredients for better blending.
– Avoid overmixing the batter to maintain a light and fluffy texture.
– Adjust the baking time based on your oven’s temperature for the perfect golden crust.
– Allow the cake to cool completely before slicing to preserve its moisture and flavor.
By following these expert tips, you’ll be on your way to creating a Danish Dream Cake that rivals any bakery creation, impressing your guests with your baking prowess.
Variations and Substitutions
Explore creative ways to customize your Danish Dream Cake with these variations and substitutions:
– Experiment with different toppings such as nuts or fruit for added texture and flavor.
– Substitute traditional flour with almond flour for a nutty twist on this classic recipe.
– For a vegan alternative, use plant-based milk and egg substitutes to create a cruelty-free version of Danish Dream Cake.
Embrace your creativity and tailor this recipe to suit your preferences, making each slice of Danish Dream Cake a unique and personal delight.
Serving Suggestions
Enhance the experience of enjoying Danish Dream Cake with these serving suggestions:
– Pair each slice with a dollop of whipped cream or a scoop of vanilla ice cream for a decadent treat.
– Serve alongside a cup of hot coffee or aromatic tea to complement the rich flavors of the cake.
– Garnish with fresh berries or a sprinkle of cinnamon for a visually appealing presentation.
Whether you enjoy it warm or chilled, Danish Dream Cake is a versatile dessert that pairs beautifully with a variety of accompaniments, making it a delightful addition to any meal.
FAQs
Explore common questions and troubleshooting tips for mastering Danish Dream Cake:
Q: Can I make Danish Dream Cake ahead of time?
A: Yes, you can prepare the cake in advance and store it in an airtight container for up to three days.
Q: Why is my cake not rising properly?
A: Ensure that your baking powder is fresh and that you are not overmixing the batter, as this can lead to a dense cake.
Q: Can I freeze Danish Dream Cake?
A: Yes, you can freeze the cake for up to one month. Thaw it in the refrigerator overnight before serving.
By addressing these common queries, you’ll be equipped with the knowledge to troubleshoot any issues that may arise during the baking process, ensuring a flawless outcome every time.
Final Thoughts
As you embark on your culinary journey with Danish Dream Cake, remember that each bite tells a story of tradition, flavor, and indulgence. Whether you’re a novice baker or a seasoned pro, this recipe offers a gateway to Danish culinary heritage, inviting you to savor the magic of this beloved dessert.
So, roll up your sleeves, preheat your oven, and let the aroma of Danish Dream Cake fill your kitchen with warmth and joy. Share this delectable treat with loved ones, and create lasting memories around the table as you experience the joy of baking and indulging in a slice of Danish sweetness.
From its humble beginnings to its modern adaptations, Danish Dream Cake continues to captivate hearts and taste buds around the world, offering a taste of Danish tradition with every mouthful. So, why wait? Dive into the world of Danish Dream Cake and let its flavors whisk you away on a culinary adventure like no other.
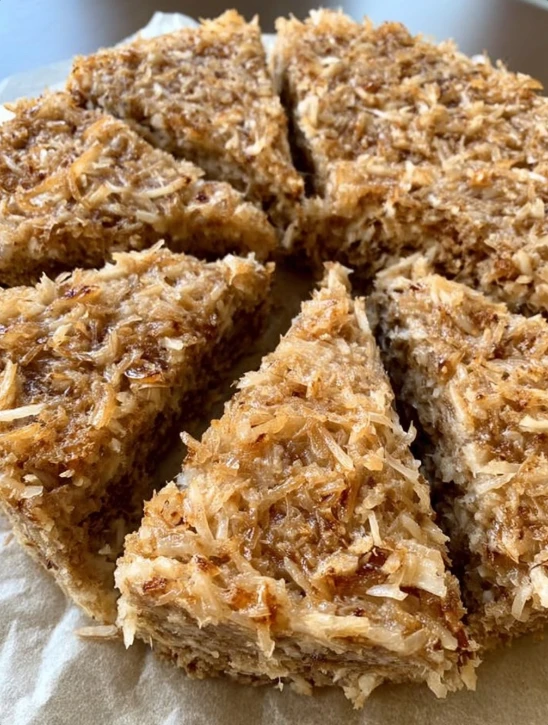
Danish Dream Cake
Indulge in the delightful world of Danish Dream Cake, a classic dessert from Danish culinary traditions. This buttery cake with a luscious coconut topping offers a perfect blend of simplicity and indulgence.
Ingredients
- 2 cups all-purpose flour
- 1 cup sugar
- 1 cup unsalted butter
- 1 cup milk
- 1 teaspoon baking powder
- 1 teaspoon vanilla extract
- 2 large eggs
- 1 cup shredded coconut
Directions
- Preheat your oven to the specified temperature and prepare a baking pan.
- In a bowl, mix the all-purpose flour, sugar, and unsalted butter to create the cake base.
- Add milk, baking powder, and vanilla extract to the batter mixture.
- Beat the eggs separately and then fold them gently into the mixture.
- Pour the batter into the prepared pan and sprinkle shredded coconut on top.
- Bake the cake until golden brown and allow it to cool before serving.
Nutrition Facts