
Introduction
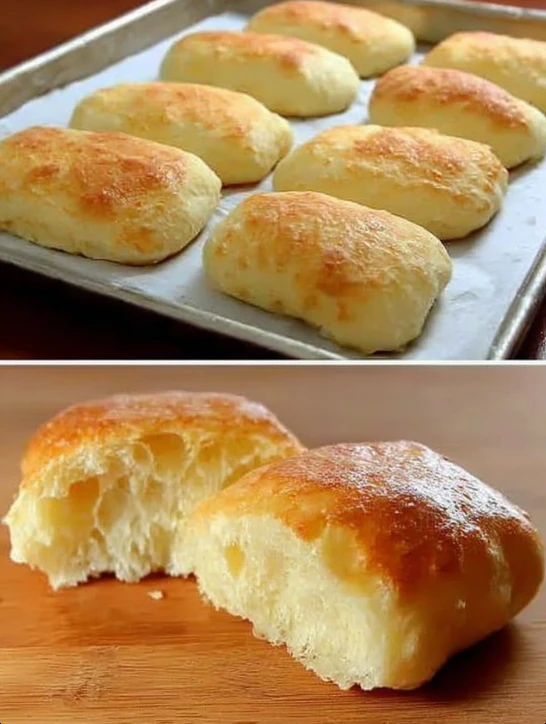
Welcome to the world of rustic and flavorful Sunday-Table Rustic Ciabatta! Imagine the aroma of freshly baked bread filling your kitchen, the crusty exterior crackling as you break into it, and the soft, airy interior melting in your mouth. This recipe is not just about making bread; it’s about creating a culinary experience that brings warmth and comfort to your table.
What makes this ciabatta special is its simplicity and versatility. With just a few basic ingredients, you can craft a loaf that rivals those from artisan bakeries. This Italian classic is known for its irregular shape, open crumb structure, and slightly tangy flavor—a perfect canvas for your favorite spreads, cheeses, or dips.
Rich in history, ciabatta bread originated in Italy in the 1980s as a response to the growing popularity of baguettes. Its name, which means “slipper” in Italian, is derived from its shape, resembling a house slipper. This bread quickly gained fame for its unique texture and taste, becoming a staple in households worldwide.
So, roll up your sleeves, preheat your oven, and let’s embark on a culinary journey to create a Sunday-Table Rustic Ciabatta that will elevate your baking skills and delight your taste buds!
Why You’ll Love This Recipe
Indulge in the joy of baking with this Sunday-Table Rustic Ciabatta recipe that is not only delicious but also a feast for the senses. Here’s why you’ll fall in love with this bread:
The simplicity of the ingredients and the minimal hands-on time make this recipe perfect for novice bakers looking to hone their skills.
The crispy crust and chewy interior of the ciabatta offer a delightful contrast in textures that will leave you craving for more.
This homemade ciabatta is free from additives and preservatives, ensuring a wholesome and authentic bread-making experience.
Whether you follow a vegan or vegetarian diet, this recipe can be easily adapted to suit your dietary preferences, making it a versatile choice for all.
Ingredients
To create your own Sunday-Table Rustic Ciabatta, you will need the following ingredients:
3 1/4 cups bread flour
2 1/4 tsp active dry yeast
2 tsp salt
1 1/2 cups lukewarm water
1 tbsp olive oil (for greasing)
Optional ingredient substitutions:
If you prefer a whole-grain version, you can substitute half of the bread flour with whole wheat flour for added nuttiness and fiber.
For a herb-infused ciabatta, consider adding dried rosemary or oregano to the dough for a fragrant twist.
Experiment with different types of salt, such as sea salt or Himalayan pink salt, to enhance the flavor profile of your bread.
For a richer taste, substitute olive oil with melted butter or infused oils like garlic or chili oil.
Step-by-Step Instructions
1. In a large mixing bowl, combine the bread flour, yeast, and salt. Mix well to distribute the yeast evenly.
2. Slowly add the lukewarm water to the dry ingredients, stirring with a wooden spoon until a shaggy dough forms.
3. Cover the bowl with a damp kitchen towel and let the dough rest for 1 hour to allow the yeast to activate and the gluten to develop.
4. After the resting period, the dough should be sticky and elastic. Transfer it to a well-floured surface and fold it gently to shape it into a rough rectangle.
5. Fold the dough in thirds like a letter, then rotate it 90 degrees and fold it again. Repeat this process a few times to build structure in the dough.
6. Place the shaped dough on a parchment-lined baking sheet, cover it with a kitchen towel, and let it rise for another 45 minutes until puffy.
7. Preheat your oven to 450°F (230°C) with a baking stone or an upside-down baking sheet inside to create steam during baking.
8. Slash the top of the risen dough with a sharp knife to allow for expansion, then transfer it to the preheated baking surface using the parchment paper as a sling.
9. Bake the ciabatta for 25-30 minutes or until golden brown and sounds hollow when tapped on the bottom.
Expert Tips for Success
• Use bread flour instead of all-purpose flour for a higher protein content that creates a chewier texture in the ciabatta.
• Ensure the water temperature is around 110°F (43°C) to activate the yeast effectively without killing it.
• Resist the temptation to add extra flour during kneading; the dough should be sticky but manageable to work with.
• For a crustier ciabatta, place a pan of hot water in the oven while baking to create steam that enhances crust formation.
Variations and Substitutions
• For a savory twist, add caramelized onions and grated Parmesan cheese to the dough before shaping the ciabatta.
• Experiment with different flour blends, such as spelt flour or rye flour, to create unique flavor profiles in your bread.
• Swap out the olive oil for infused oils like truffle oil or roasted garlic oil for an elevated taste experience.
• To make a gluten-free version, use a gluten-free flour blend and add xanthan gum to improve the dough’s structure.
Serving Suggestions
Serve your freshly baked Sunday-Table Rustic Ciabatta warm with a drizzle of extra virgin olive oil, balsamic vinegar, and a sprinkle of flaky sea salt for a simple yet satisfying appetizer.
Pair the ciabatta with a selection of cured meats, cheeses, olives, and roasted vegetables for a Mediterranean-inspired charcuterie board that will impress your guests.
Toast leftover slices of ciabatta and use them as a base for bruschetta toppings, such as diced tomatoes, basil, garlic, and olive oil, for a quick and flavorful snack.
For a hearty meal, turn your ciabatta into a sandwich filled with grilled vegetables, pesto, fresh mozzarella, and arugula for a burst of Italian flavors in every bite.
FAQs
Q: Can I freeze the ciabatta dough for later use?
A: Yes, you can freeze the dough after the first rise. Thaw it overnight in the refrigerator before shaping and baking as usual.
Q: Why is my ciabatta dough too wet?
A: High hydration is essential for ciabatta’s characteristic open crumb structure. Resist the urge to add more flour; instead, use wet hands to handle the dough gently.
Q: How can I store leftover ciabatta?
A: To maintain freshness, store the ciabatta in a paper bag at room temperature for up to 2 days. For longer storage, freeze the bread in an airtight container for up to a month.
Final Thoughts
As you savor the delightful flavors and textures of your homemade Sunday-Table Rustic Ciabatta, remember the joy that comes from creating something delicious from scratch. Whether you’re a seasoned baker or a beginner in the kitchen, this recipe offers a rewarding experience that will elevate your culinary skills and inspire you to explore the world of artisan bread-making.
So, gather your ingredients, preheat your oven, and immerse yourself in the art of baking this classic Italian bread. Share your creations with loved ones, and let the aroma of freshly baked ciabatta fill your home with warmth and happiness. Buon appetito!
Sunday-Table Rustic Ciabatta
Create a rustic and flavorful ciabatta bread that elevates your baking skills and delights your taste buds. This homemade ciabatta is crispy on the outside, chewy on the inside, and perfect for any occasion.
Ingredients
- 3 1/4 cups bread flour
- 2 1/4 tsp active dry yeast
- 2 tsp salt
- 1 1/2 cups lukewarm water
- 1 tbsp olive oil (for greasing)
Directions
- In a large mixing bowl, combine the bread flour, yeast, and salt. Mix well to distribute the yeast evenly.
- Slowly add the lukewarm water to the dry ingredients, stirring with a wooden spoon until a shaggy dough forms.
- Cover the bowl with a damp kitchen towel and let the dough rest for 1 hour to allow the yeast to activate and the gluten to develop.
- After the resting period, transfer the dough to a floured surface, fold it gently, and shape it into a rough rectangle.
- Fold the dough in thirds, rotate it, and fold again to build structure. Repeat a few times.
- Place the shaped dough on a parchment-lined baking sheet, cover, and let it rise for 45 minutes.
- Preheat the oven with a baking stone at 450°F (230°C). Slash the dough, then transfer it to bake for 25-30 minutes.
- Bake until golden brown and hollow-sounding when tapped at the bottom.


[…] an extra touch of elegance, consider serving this dish in a cast-iron skillet, adding a rustic charm to your presentation. Now that you have mastered the basic recipe, let’s explore some […]